Showing posts with label Dairy FREE. Show all posts

Thursday, April 9, 2020

C-19 and comfort

This entire covid-19 stuff is crazy. And my kids are done with it, they want it gone. So our family is joining in the World Wide Good Friday Fast April 10.  To start our fast, we will start after dinner Thursday night, and it will go through until Friday evening.

Going a bit stir crazy, we were so happy to have nice warm weather yesterday and today. We all got a little sun burn, but we got to be outside in our yard. We played, we weeded, we checked trees for winter damage (I think I lost two trees, makes me sad) and we made a yummy dinner.

Comfort food is what is needed right now. And I am so thankful I made some sourdough starter back in February, because we have been using it. I have worked hard to figure out how to make this yummy.
1. Let your sourdough bread dough ferment in the fridge, this helps it to rise slowly, but also helps it to work better.
2. When it is time to put it into the oven, slash your dough! Extremely sharp thin knife or with a razor blade slash the dough about 1/4-inch deep. This helps with oven spring, or letting it rise correctly.
3. Mist your dough with water after slashing, but right before putting into your dutch-oven. Weather your dutch oven is piping hot from the oven or room temperature, mist it before putting into the pan.
4. Cook with the lid on for the first 15 to 20 minutes. Then remove the lid. Again, this helps with oven spring (rising in the oven). The texture of the crust is amazing if you do this too. My little guy prefers the crust this way.


Another comfort food it just food  our family normally eats. We love fresh salad, but unfortunately I am not going to go to the store for a long while, and my garden is not ready to grow anything yet. I love soups, casseroles, smoking fish and other meats, bbq, and just yummy food. Yesterday for dinner I had to make some major comfort food. All the kids were losing it, the youngest feeling like everyone doesn't like him because he can't play with friends. We went for a bike ride, waved to neighbors, and then we made dinner together.

What did we make?  Chicken Coconut Curry and it was AMAZING! Everyone went back for seconds, except the littlest one because he never goes back for seconds so we have learned to give him a large serving and not expect him to eat all of it.

Only one serving left in the crock pot.
This is one of those recipes that you can make as spicy as you like using sriracha sauce. We do not use the cilantro because there is someone that is extremely sensitive to it in our house. But honestly it is wonderful to add during serving, it adds a freshness. I just squeeze the lime into the pot just before serving. Not a lot of the juice, just a little.

We usually serve this over jasmine rice, but because of the run on rice at the store, I had to use what I had at home, which was just long grain rice. It worked. It was delicious. Below you see my second bowl of curry. I only add enough sriracha to give this a little heat, not so it covers up the flavor of the meal. I asked my kids to explain this dish. Tell me how it tastes, and they all just said super yummy and that they didn't know what it was but it just made them feel calm.

This is the real meaning of comfort food. It brought them calm, it made them happy.

Another comfort food I have not had in years, Libby Chicken Noodle Dinner. I used to love that for dinner. But it is no longer available. This to me is also comfort food. I wish it would come back. I can't even find a picture of it on the internet to show you. So sad, that was a yummy meal in a can. Great to have in your food storage.

What else comforts you? For me, it's rocking with my little one in our favorite rocking chair. Getting hugs. Snuggling my dogs. Sitting in the sunshine. Being with my family.

How about you?

Thursday, December 5, 2019

Gluten Free Tattie Scones

Have you ever heard of a Scottish Tattie Scone?  It's kind of like a thick tortilla, or thin naan. To me they are comfort food. Great with mash and meat, soup, or used as a wrap type sandwich. I love naan, but these are faster and just as yummy.
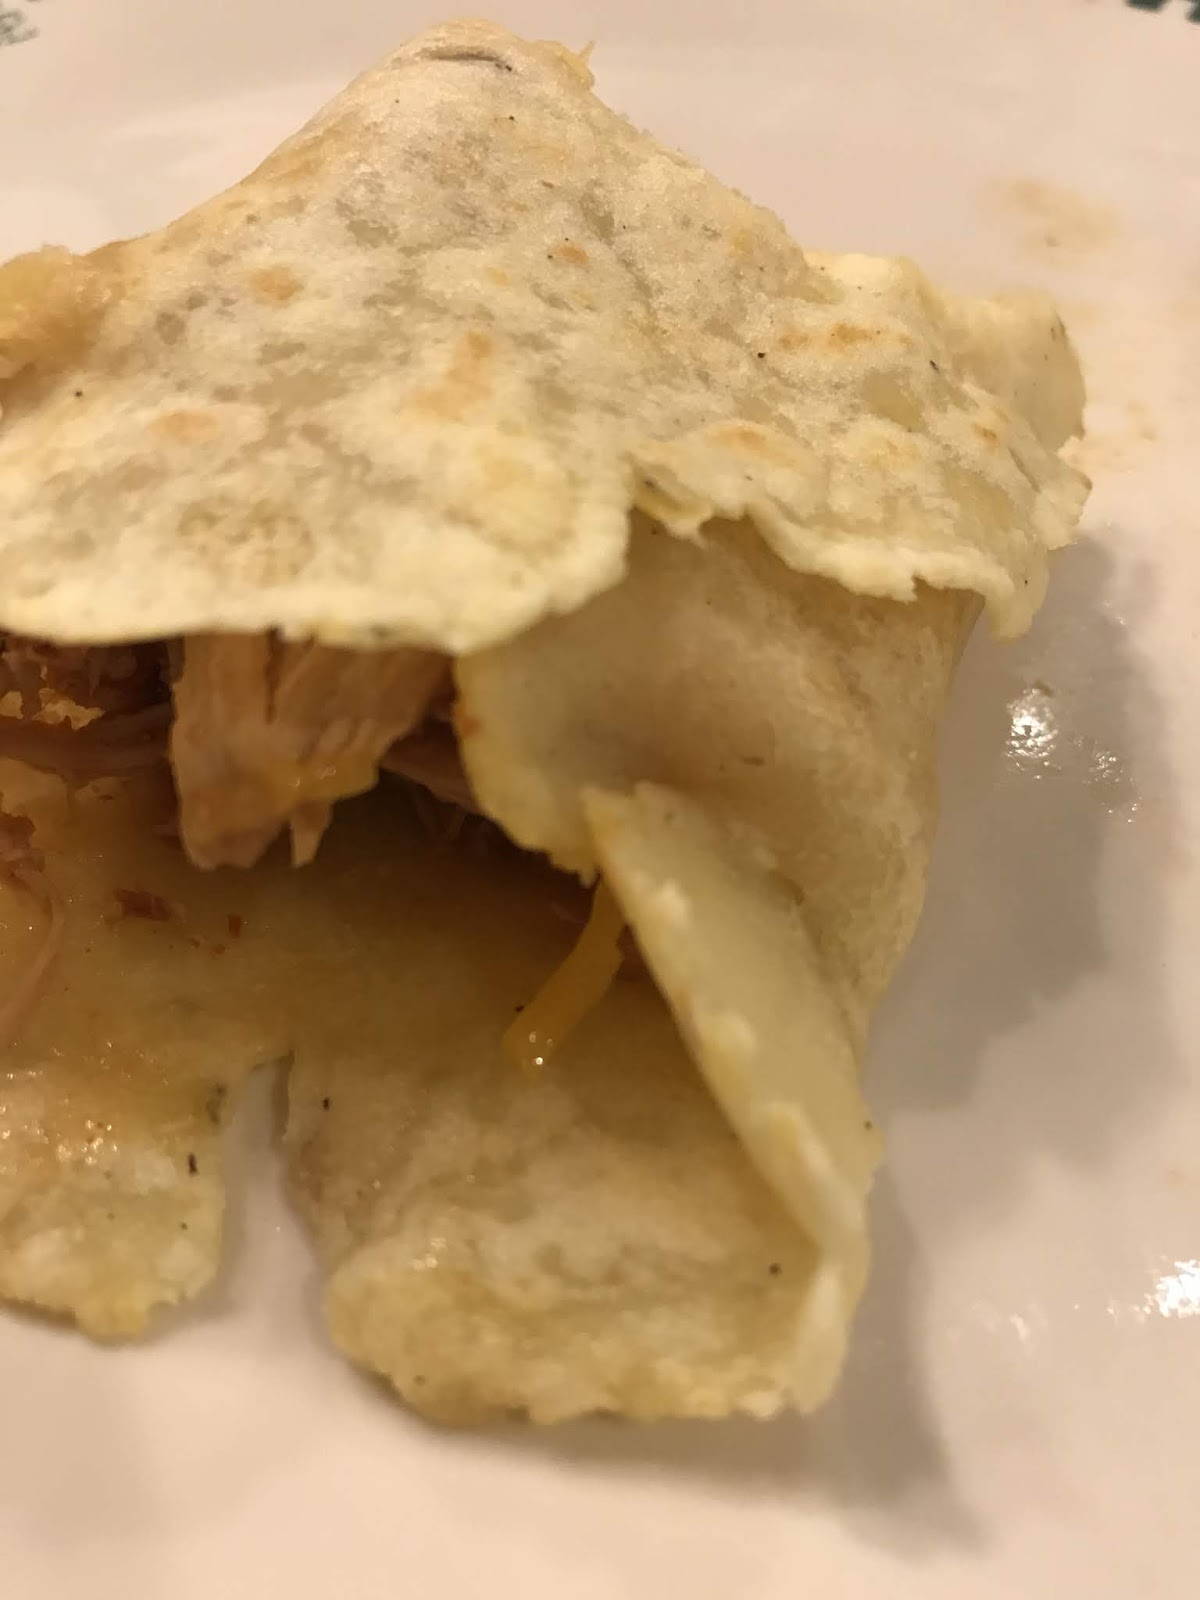
This one is fresh off the pan. I then stuffed it with rice (on the plate), cheese and shredded chicken. This can be rolled burrito style, but not too tight or it will rip.

I do not like GF tortillas you find in the store. I think they are made by mission. I have tried both the white ones and the green ones. Both were sticky, gummy, pastie and flavorless; not to mention EXPENSIVE!

I have had the Scottish Tattie Scone recipe forever, but I have only made them once since we moved 2 years ago. Why? I forgot about it. But we used it with a soup the other night. But tonight  I had the chicken in my crock-pot and everyone else could use a flour tortilla, so I decided to try to make a GF tattie scone and see if it would work. Not only does it work, but it tastes AMAZING.
I almost ate the entire thing before remembering I wanted a picture! So yummy I made more, and yup they are already gone. This recipe is very easy, can be dairy free (DF), corn free (CF), soy free (SF) and of course gluten free (GF). I will admit, mine were not DF. But they could have been.

So I used leftover mash to make these, and DS2 made the mash so there was butter, parmesan, garlic and half and half in them. Which, by the way, were amazing yummy spuds. Rules with GF flour, it has to be cooked through, for some reason. It may seem this dough is too dry, but honestly it all mixes in, and makes a wonderful dough.

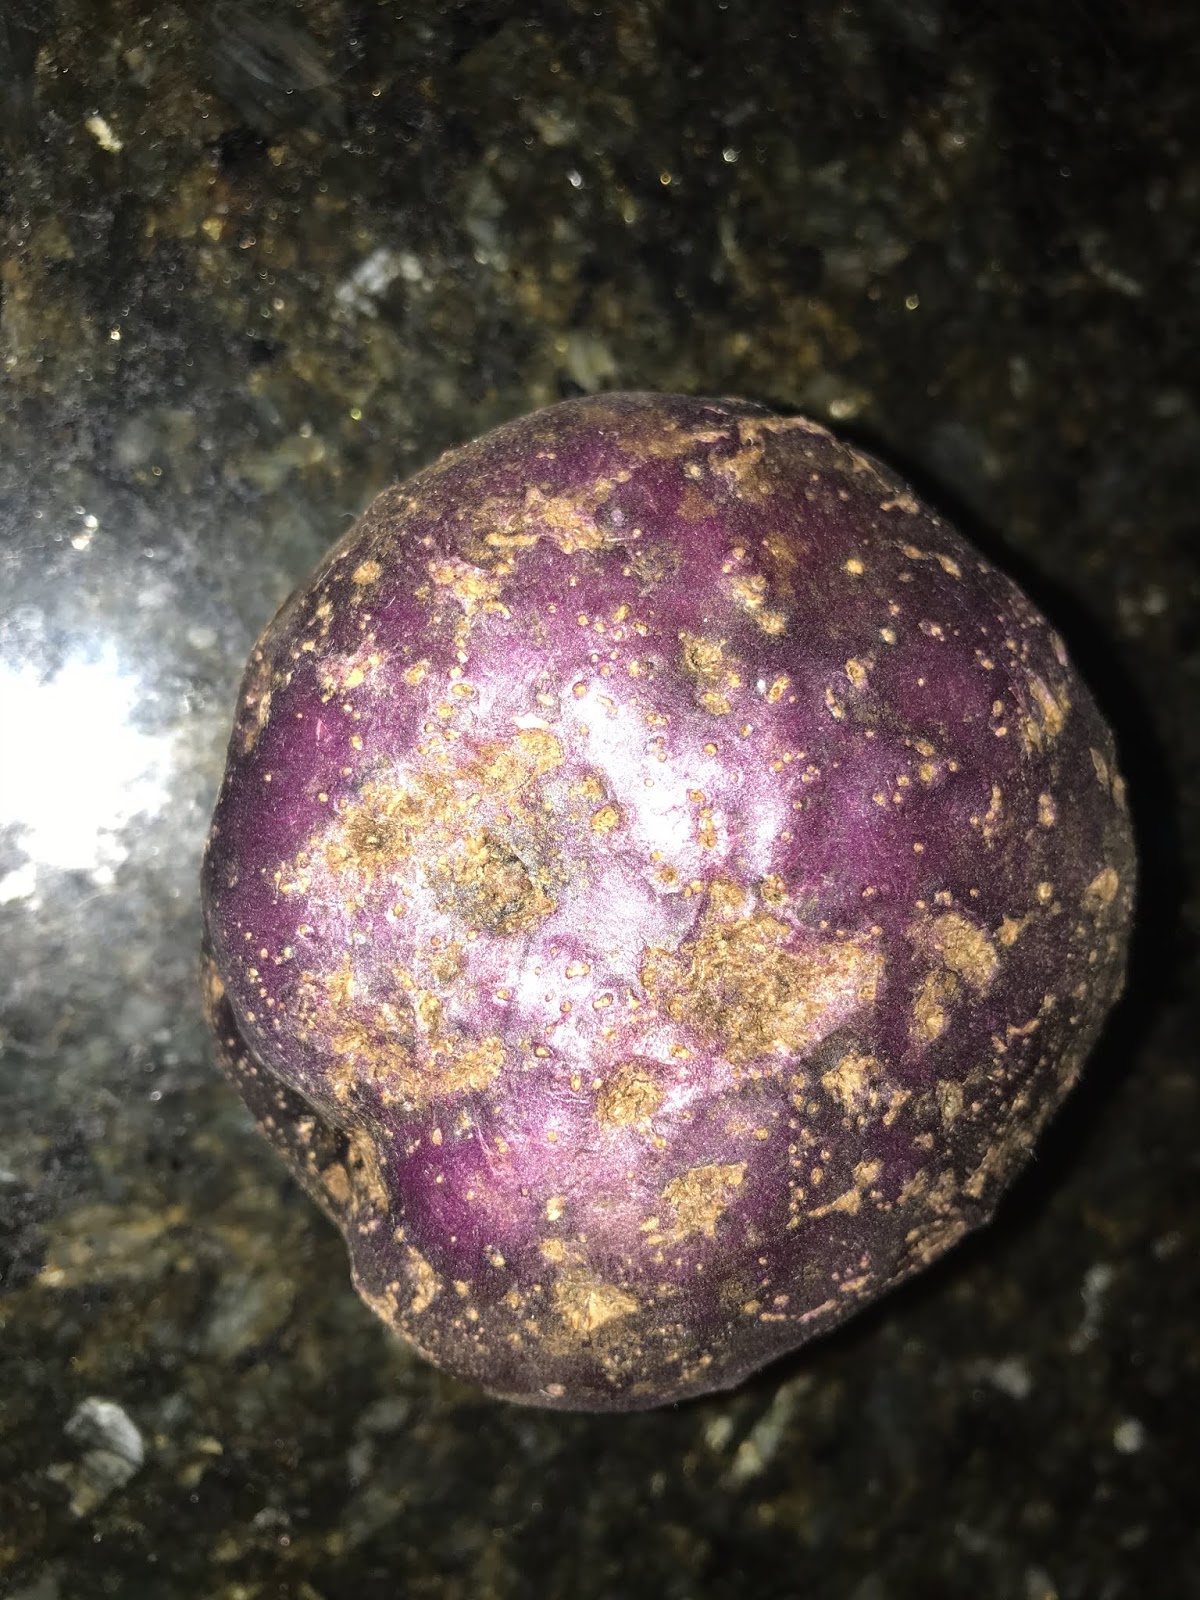
The spuds we used are called Huckleberry Golds, and they are one of the ugliest potatoes I have ever seen. Purple skin, that is kind of warty, with beautiful golden flesh.

They are very dense and delicious.

I took two pictures, one with and one without the flash. The purple is very vibrant in the sunlight. The interior flesh is a wonderful yellow gold.

I used Mom's Place GF flour blend (locally made) , link is in the name. I love Mom's Place, so far theirs is the only gf blend I like.
Ok so would you like to try them? These are yum! I love them. My kids like them too.


Scottish Tattie Scones
Half pound boiled mashed potatoes (King Edwards if you can get them)
2.5 oz (65 g) all-purpose flour (wheat OR GLUTEN FREE)
1 oz (25 g) butter (OR coconut oil, olive oil, ghee, etc)
pinch of salt
pinch of pepper
1/4 tsp baking powder

Boils spuds in salted water until tender. Drain, mash with butter, S & P, and baking powder.*
Mix in flour to make stiff dough (exact amount depends on type of potatoes used).

Roll out on floured surface to 5 - 6 mm thick. Cut into rounds, use a saucer or small tea plate as a guide. Prick all over with fork and score dough to mark 4 equal wedges. Cook in lightly greased heavy pan or griddle over medium heat. About 3 minutes per side or until golden brown.**

*OR use leftover mash potatoes, add S & P, baking powder and flour, mix until stiff dough.

**Divide into 4 pieces, and roll into a ball. Then take a ziplock gallon bag and cut the sides open. Place ball in center of one side, put other side on top and use a heavy pan to flatten ball. If that is not enough then gently roll out to 4 to 6mm thick.
When making GF, I roll these out to 3mm thick, but you could go thicker, they will take longer to cook. I do NOT prick with a fork all over, because they are very thin, and I cook them like a tortilla.

 Cooking the first side, I also turned it around a little as my pan wasn't quite hot everywhere yet. Half of it was cooked so I turned it clockwise to get the other side done.
 Then I flipped it. and the smells.. made my mouth water. Using garlic mash is amazing for these.


 Well stuff with chicken, rice and cheese. And it was worth the 5 minute wait while I got the pan heating up, mixed the dough, rolled it out and cooked it. FAST AND EASY AND so worth it. NOT gummy, NOT sticky, NOT hard to make. This is one that will be made often as a bread for me.


Wednesday, November 13, 2019

Do you know about TURMERIC?

This beautiful root is amazing!  It has so many benefits, and is so good for you.
What is it? It is a rhizome root, kind of like ginger.
It has a warm, bitter taste and is frequently used to flavor or color curry powders, mustards, butters, and cheeses. But the root of turmeric is also used widely to make medicines. The active ingredient that is so good for you is curcumin. Since curcumin is a fat-soluble compound, the most effective way to get raw turmeric into your system is by combining it with fat and black peppercorns. This is also true for ground turmeric.


Isn't it pretty?!

Today I made "Golden Milk" for my soon to be DIL and for my dear little guy. She is super sick, but he has a kidney and bladder infection. Hopefully this will help both of them. It is creamy, and warming, and pretty yummy.

I will say this. Using fresh ginger and turmeric is always going to be better, but to be honest.. Fresh turmeric is $$$$ at my local store is it $18 for 8 ounces!  I just can not afford that. BUT I do buy fresh ginger.  The link is in the Golden Milk. Here is what I used:

I used the coconut milk can to measure the almond milk as well, so I didn't have to dirty another dish.

1 full fat canned coconut milk (so didn't need the coconut oil)
 Almond Breeze Unsweetened Vanilla Almond milk
2 inches of fresh ginger that was peeled and that I cut into small pieces and put through my garlic press OR 1/2 tsp ground ginger
fresh ground black pepper (about a pinch or 1/8 tsp or so)
2 tsp of ground turmeric
1/2 tsp ground cinnamon
RAW honey to taste

In my 3-qt sauce pan, I put the coconut milk, almond milk (measured with coconut milk can), ginger, pepper, turmeric, and cinnamon. I heated this over med-low heat until it was very warm. DO NOT BOIL. I wanted this warm enough that the turmeric and cinnamon would be activated by the coconut oil in the milk, but not too hot. I kept it very warm for about 15 minutes. Then I pulled it off the heat, gave it another good stir and let it sit. When it was finally cool enough, I added 1 TBS of raw honey and stirred well. Then I tasted it, and put in a little more honey. I strained this as I put it into jars so as not to have that ginger sitting in there too long and getting bitter.

This is DELICIOUS, but I am saving this for my DIL and my lil one. So he will have it tonight before bed. So simple to make, so yummy.  It is in the fridge right now, and I pulled it out to take a picture, and it smells so yummy I had to taste it.. WOW.. gonna have to make more!


Tuesday, September 17, 2019

Part of the September Challenge

I am finally getting to my chicken broth. This is the broth I mentioned the other day. I am not canning it until tomorrow morning. BUT, I got the chicken backs baked! Our favorite seasonings on baked chicken are salt, pepper and paprika. Super easy, and super yummy!
Yes, I ate some of the cooked skins, delicious!

Then I through some mire poix (carrots, onions and celery), bay leaves, turmeric, garlic, salt and kale into my crock pots; today I used curly, dinosaur and purple kales.

I used 2 crock pots, that is why you get 2 pictures.

 Really pretty right? What next? I tossed 14 backs on to the pile of veg. 

This almost looks like some kind of fancy salad. Now I added water to cover everything.
My goodness, my mouth is watering just looking at that deliciousness. Now we have to wait about 24 hours cooking this on low. Sometime in the morning tomorrow or the next day I will strain the liquid, then can it in my pressure canner. My next batch will be smaller and will be for working on my recovery.

Now if I needed this because I was sick, or using this as a medicine during recovery, I would NOT can this. I would strain it, then put it in the fridge. The collagen (gelatin) and minerals in this broth are amazing for helping one to heal, and the canning process kinda kills them.

UPDATE: Ok, just pulled these out of the canner.


Thursday, November 8, 2018

Crock Pot or Instant Pot Challenge WEEK #2

Today marks the first day of week 2, November 8 to 14th. I am so excited, making my first butternut squash soup with a butternut from my garden! It smells great, dinner in in about an hour. I am going to throw some rolls in the oven to have with it, because soups need something dipped in them. I got this recipe from Taste of Home. I got the recipe out of a TOH book, and didn't know the reviews, but it smells good, and the little guy might like a cinnamon soup. Here is a sad picture of it cooking.
 So here is the Butternut Squash Bisque.
So I pureed the soup. That's what you do with bisque. BUT let me tell you my changes first. I followed the recipe, but honestly, the cooking in OJ in oven is a waste. LEAVE out the OJ and brown sugar. The apples add plenty of sweetness. I also added 2 tablespoons of short grain rice to the crock pot after I took the picture above, to thicken it a little, and give it a better mouth feel. I also added half a pint of home canned cannellini beans that I drained and rinsed to add some protein to the soup.
 THIS SOUP WAS WAY TOO SWEET!!!  Trust me, leave out the OJ and brown sugar. Don't bother roasting the squash in the oven first. DO NOT use 1/2 cup butter, it was too much. I doubled this and still only used 1/2 cup butter for the onions and it was too much.
The rice helped with the mouth feel, and the beans kind of toned down the sweetness. I might make this again, with changes. BUT I don't know. The cousin thought it was a warm dessert soup.

November 11th: Veterans Day..While in the morning I somberly remembered my Grandfathers, and their brothers who have served. I also remember our Angel girl.. who fought a different war, a war against Medical Discrimination and Gene Discrimination. Although I think of her daily, I was a wreck most of the morning.
Today we used our instant pot to "bake" potatoes. Then the piper mashed them and made "his special recipe" for garlic mash. They were delicious!

November 12th: BONE BROTH.. I make bone broth almost weekly, this time I accidently made it with too much water. I am used to having bones from 2 chickens in the pot, not one.. So I messed up. Owell, I just won't have to dilute it before using it. I got 4 quarts total, normally I get 4 quarts from 2 birds.
For dinner tonight I pulled some chili from the freezer that I made in the instant pot last month. Threw that and some shredded cheddar in some tortillas and fried them up in butter, DELICIOUS.

November 14th: LAST day of week #2, and wow Guess what I did??? I messed up!!  I forgot to read both sides of my recipe card.. So I tripled my recipe for Chili but... ok, so I tripled the meat, but I have to multiply everything else by 6 !! WOOPS  So ya..

I love this chili recipe. It is so yummy. I got this recipe from my sister, and I doctored it up a little. Hands down our families favorite chili, and we eat a lot of chilis.
Can you smell this? OMGoodness my mouth is watering.. I almost said my watering mouth.. either way.. let me wipe the drool off my chin. We usually top this yumminess with some shredded cheddar. The little one likes a little sour cream too as he doesn't like spice (except buffalo wings).
BEST CHILI EVER 
2 tablespoons bacon grease or oil
1/2 cup water
1 pound ground meat (beef, chicken, turkey or pork, whatever you like)
1 cup chopped onion (I use 1 whole small or medium)
2 poblano peppers, roasted, peeled and seeded
1 1/2 teaspoons salt
2 teaspoons cumin
4 teaspoons chili powder
1/2 teaspoon oregano
4 to 6 cloves garlic, minced (the more the merrier for us!)
2 - 15 ounce cans tomato sauce (or 1 - 29 ounce can)
2 - 16 ounce cans beans (pinto, cannellini, black, garbanzo, whatever you like)
2 cups bone broth, stock or water

Heat oil and water in a stockpot a minute. Gently cook meat with onion until no longer pink, and water has mostly boiled off. While meat is cooking, add prepared poblano and broth to blender, and blend to almost smooth. If you don't have a garlic press, then add to blender.  Add spices to meat and let warm for 2 minutes, then add the rest of ingredients. Bring to a boil, lower heat, partially cover pan and simmer 45 minutes. Makes about 3 to 4 quarts
CROCK POT: Follow directions above until you have warmed spices. While meat is cooking, place beans, tomato sauce, 2 prepared poblanos and broth mix, garlic, oregano if you didn't put in with meat. When meat is done, add to crock pot, give a stir. Cook on HIGH 3 to 4 hours, Low 4 to 6 hours. 

We also use this chili for making quesadillas: tortillas, chili and cheese.
We put chili on half the tortilla, top with cheese, fold empty side over the cheese and fry in butter on each side until golden brown.. My FAVORITE meal growing up.

It's dinner time!!!!!


Thursday, February 12, 2015

Amazing little GF muffins

I accidently found this recipe this morning. I now have so many food restrictions that it is getting more difficult to find fun things to eat. this little gem is flour free! Can be made sugar free! The texture is like a light fluffy muffin! Love it. Unfortunately this is not a nut free recipe. But there are so many options out there for nut and seed butters. No, you may not use cow butter or ghee. Sorry.

I found this amazing recipe over at Whole Lifestyle Nutrition. A great site for those looking for better options. I will post the recipe as is posted on the site, then put in my changes at the end. I highly recommend you visit the site, lots of great stuff over there.


Prep Time: 5 minutes
Cook Time: 15 minutes
Yield: 12 muffins or 24 mini muffins
Serving Size: 1 regular muffin or 2 mini muffins
Recipe adapted from The Sweet Spot
Ingredients
  • 1 cup nut butter - you can buy nut butters here
  • 2 medium sized bananas (The more ripe, the sweeter!)
  • 2 large eggs 
  • 1 teaspoon vanilla (try making your own!)
  • 2 tablespoons of raw honey(or other sweeteners such as maple syrup, stevia, etc.)
  • ½ teaspoon baking soda
  • 1 teaspoon apple cider vinegar
  • Toppings: dehydrated unsweetened coconut flakes, raisins, flaxseed, dark chocolate chips, cinnamon, and/or anything else you can think of. I added even more tupelo honey ;) Feel free to lather on apple butter, strawberry preserves, or even more peanut butter. Ever heard of carrot jam? It's very tasty with this snack, too!
Instructions
  1. Preheat oven to 400 degrees F.
  2. Place all ingredients into a blender or food processor. You can also use a stick blender if you have one.
  3. Blend until well mixed.
  4. Pour batter into a greased muffin tin. You can also use a mini muffin tin to make 24 mini muffins.
  5. Add additional toppings of your choice to each muffin and lightly stir into each cup
  6. Cook time: 15 minutes for full size muffins and 10 minutes for mini muffins.
  7. Reheat in a toaster oven for about 4 minutes at 350 degrees F, or eat at room temperature.
Notes: I first made this in a half batch. I used half almond and have peanut butter. I used 1 1/2 TBS RAW honey, and I added 1/4 cup mini gf chocolate chips. I also used my stick blender to blend them.

What I would do next time: use a riper banana (mostly brown almost black), only use peanut butter. Taste the batter and check for sweetness.. maybe use a little more honey, but using a riper banana will help with sweetness as well.

The texture was NOT rubbery, was NOT dense, WAS light and fluffy, like a normal muffin.

This one is being printed and being put into my GF recipe file.

Definetly also check out Averie Cooks  These little GF puffs look very promising, although not dairy free, I am wondering if they can be made with a dairy free alternative. Like dairy free sour cream (for those who are DF). 
 

Wednesday, July 23, 2014

Gluten Free Pizza Dough

Oh my goodness!! Trying to find a decent GF pizza dough that isn't full of corn or soy flour is ridiculous! Peaches and I have tried so many different kinds that I think we are sick of pizza right now.. BUT, I just happened to make one up the other day.. and it was pretty good! So good that she took some dough to a mutual event where they were making pizzas so that the other GF people could have some pizza too. AND THEY LIKED IT!!!!!

It's so simple it's crazy! I roll my dough out thin between pieces of parchment paper.

GF Pizza Dough

2 1/2 cups flour *
1 tsp instant yeast
1 tsp salt
1 TBS + 2 tsp olive oil
1 cup + 1 TBS warm water

Put oil in measuring cup first!! Then add enough warm water to equal 1 cup + 1 TBS total liquid.

Combine dry ingredients. Add water mix. Stir well to combine all. Cover and let rest in warm spot for 2 hours. Then refrigerate at least 3 hours.

When you are ready to make your pizza, use a little flour on top and cut dough  in half. Place dough on flour dusted parchment paper. Cover with another piece of parchment. Roll out thin, I usually roll it out to 1/8-inch thickness, but Peaches rolled hers out to 1/4 inch at mutual and said it was cooked through. 
Heat oven to 450 - 500 degrees with cast iron pan in oven. After topping dough with sauce etc.. place on HOT cast iron pan and bake for 8 - 12 minutes or until desired doneness..

* I mixed up flour: 1 cup white rice flour, 1/2 cup millet flour, 1/2 cup potato starch, 1/2 cup tapioca starch and 1/4 tsp. xanthum gum

**NEVER eat raw GF dough. Not sure why, but that is a warning label on most GF flours.

Milks

There are so many milks to choose from now. It is wonderful! Back when my brother was a baby he couldn't have milk. But the only milk alternative was Mocha Mix (YUCK!). He always had a yucky runny nose. He also couldn't have eggs, although he loved them. When DD#2 was born, she broke out with horrible eczema all over her face and ears. My midwife had me take milk and wheat out of my diet for a month. It cleared up. She then said I could try either milk or wheat, but not both, at one meal and see how she did.  I tried a piece of toast.

She did not do well! The rash came back with in 6 hours, and it was worse than ever. I had to wait another 30 days to try milk. When I did, she broke out again. She was a year old when I could finally have some dairy. She stopped nursing just before she turned two, because her sister was born and she said it was the baby's milk. So DD#2 got rice milk.. ugh.. not my favorite, but she loved it.

DD#2 would throw up if she got dairy, and break out in eczema. Poor thing. She would do ok with a single piece of cheese for the week. Or a single scoop of icecream, but more than that and she would get dark circles under her eyes, then throw up violently.

Fast forward 12 years, and wow so many dairy free options! and of those most are soy FREE!!!  Woo hoo!  yes there is Rice Dream rice milk but there is also: Coconut Dream, coconut/almond/chia dream, almond dream, SILK almond milk, Almond Breeze, Oat milk, Hemp milk, .. wow!!

Current baby is just like DD#2 and can not have dairy.  He also, it looks like, will be going gluten free.. Poor guy. He still prefers breastmilk, and if he sees it is milk of any kind in the glass with the straw, then he pushes it away. He wants water..

What's your favorite dairy free milk?

Tuesday, April 29, 2014

The GLUTEN FREE dilemna

Going gluten free is not the easiest thing to do. It is just unimaginable where you will find wheat and gluten! We are also corn free here, so we have already been avoiding that (and that is also unreal!).

At first when you have to eliminate something from your diet, all you can think of is that which you can no longer have. With corn you think of all those "wonderful" processed foods like cookies, chips, frozen junk etc.. Well with gluten/wheat it's bread. Candy. Cookies. Gravy. Some sausages. Donuts. Muffins. Bread. Buns. Croissants. Spaghetti. Mac and cheese. Bread. Gravy. Pizza. Sauces. Bread. Vanilla extract. Gravy. Some alcohols like beer, some rum, some vodka, some whiskey (IF you drink or make your own tinctures, medicines, or Vanilla).

Do you see what I mean? Do you see what you are missing? I used to make bread almost everyday. But since our last blessing was born I have had to be very dutiful in being GF. Why? Because not only do I react to it, but so does the baby. What am I missing? Nausea, stomach cramps, debilitating migraines, vomiting, acid reflux, itchy skin, abdominal pain that made me double over. Am I really missing anything? I think not.

I am learning to make things GF. Muffins come out reasonably good. Cookies, no problem. pizza..um.. not quite yet. Which is a bummer because Christmas 2013 I perfected my pizza crust recipe and it was AMAZING! So now I am working on perfecting a GF pizza dough recipe.

As for pasta, well, I am not really missing it. I use rice pasta. We tried buckwheat pasta, but it has a very strong distinct flavor. Quinoa pasta is hard to find not mixed with corn or soy. But to replace pasta, I just use rice pasta. Peaches likes hers with quite a bit of chew to it, so we don't cook it as long as directed. But really, I only miss lasagna and spaghetti.. but not really because I can use rice pasta or spaghetti squash.

If you look for what you CAN eat when on a special diet, the whole food world opens up. Here in Washington, so many people are gluten free it is awesome! Restaurants are being more and more accommodating. One of our favorite places to go will wrap your burger in lettuce or use a GF bun. They also inform you that their fries are NOT GF, AND neither is their guacamole :(  Which means their guacamole comes premade (yuck), honestly it isn't that hard to make!

So what can a GF person eat? Well for starters pretty much all of the produce department is GF. Same with most of the meat department, minus some sausages and seasoned meats. Some of the dairy department is also GF.

A great way to have organic free produce is to grow it yourself. Lettuce grows easily, so do snap peas, zucchini, cucumber, strawberries, onions, garlic, tomatoes (if you have a very sunny warm place), pumpkins, butternut squash, spaghetti squash, beets, spinach, kale, chard, collards... really you pay a little for some seed or starts and you have a plethora of veg and fruit for summer.. and you can freeze the extras! Or can them. Or dehydrate them..

So going with out.. You aren't really going with out. Feeling better is so worth it!

Friday, March 29, 2013

GF MINI LOAF

I found this by chance. It was supposed to be cooked in microwave, but since I don't believe in microwaves being safe, we bake it. And it works out great!  YOU need to use the GF flour mix recipe I have on the site, as it has the baking powder in it.

GF Mini Loaf

1 egg or 1 TBS flax meal AND 3 TBS water
3 TBS buttermilk*
1/3 cup gluten free flour mix
1 tsp. honey or sugar or agave

Combine wet ingredients first, then dry. Stir well. Pour into small loaf pan (SMALL, like one from a kids baking set). Bake at 375 for 20 minutes in the MIDDLE of the oven.

*you can use dairy free milk. Just add a tsp. of lemon juice or vinegar to make it "buttermilk" to make a total of 3 TBS of "buttermilk".

Depending on your flours, and liquids, and weather, the middle can sometimes be sticky, but we like the ease of this recipe, quickness of it, and the flavor can always be changed by adding dry herbs.

Chocolate Pots De Creme

Yes it is a dessert. But do you know how hard it is to find a dessert that is CF, GF, DF,  & SF that isn't just cut up fruit????? Super difficult! You can use any milk, any sweetener, and any extract you desire. Sorry, no picture, I have made this twice this week, and it just disappears too quickly!

Chocolate Pots De Creme
2/3 cup semisweet chocolate chips*
1 cup half and half **
2 eggs***
3 tablespoons sugar ****
2 tablespoons rum*****
dash of salt

Heat oven to 350 degrees. Heat chocolate chips and half and half, stir until melted and combined. Take off heat. Cool slightly. Beat remaining ingredients. Gradually stir into chocolate mixture. Pour through a fine strainer into four 6-ounce custard cups or a corning ware dish.
Place cups or corning ware dish in pan on oven rack. Pour boiling water into pan to with in 1/2-inch of tops of cups. Bake 20 minutes for cups and 25 to 30 minutes for corning ware dish. Cool slightly. Cover and refrigerate at least 4 hours. Serves 4

*we used GF, CF, SF, DF semisweet chocolate, or dark baking chocolate (we prefer dark chocolate, for flavor and health benefits)
**I have used half and half, whole cow milk, coconut milk, almond coconut milk..
***we used organic farm fresh eggs (our own)
****I have used sugar, honey, and agave nectar.  I prefer honey. If using honey or agave nectar only use half as much as called for in recipe
*****NO rum here. But I have used a tablespoon of GF, CF REAL vanilla extract, GF/CF almond extract (1/2 tsp and then the rest vanilla)

This recipes is super easy to make, super easy to make dietary restrictions work in. ALL my kids love it. NO I do not refrigerate it for 4 hours. I let it cool 20 minutes, then stick it in the freezer for 20 minutes, and whalaa, yumminess.. if I can keep the kids out of it that long.  Yes I do strain it so there are no chewy egg chunks, which happens when the eggs curdle.. yuck.. But it still tastes good.

Sunday, November 4, 2012

Broccoli Cheese Soup

Now wait, you have to try this. Don't run away. I saw them make this last night on America's Test Kitchen, around midnight or so. It looked so good I dreamt about it!!  And to top it off, Bo ate 2 LARGE bowls!!!  My mom was in shock! She couldn't believe it. When he asked what was for dinner I said green soup. He was all, "All right! I love green soup!"  And he did! He couldn't get enough of it. BUT he is also the one I sent to the freezer to get the spinach, and well, he LOVES spinach. He won't eat a smoothie unless it has spinach in it!  Unfortunately I couldn't find the camera to take a picture of it. IF I am home for lunch tomorrow, I will try to get a picture of it..

Understand I have not been feeling well for about 3 months now. Lots of hospital visits, tests, and more tests.. it has not been fun. I am only able to be up and moving around now for about 10 to 30 minutes before the pain gets too much, which causes extreme nausea.
So I was happy to try to make this soup today. How long did it take me? 30 minutes. And I also got a spinach artichoke dip thrown in the oven too! I did that while waiting for the broccoli to cook for 20 minutes.
The spinach and artichoke dip is in the blog post with crock pot stuff and a butternut squash soup. I love spinach and artichoke dip.. So our dinner was very green today.. no really literally all green!! 


Just a warning.. I didn't really measure. I have noticed that lately our best meals have literally been thrown in a pan, and ready in 10 to 20 minutes. I just need to remember that my best eater is on his mission.. hence leftovers...which is good, I have something for lunch tomorrow.  AND so you know, I always taste things as I go when making so I can adjust seasonings and such.. I almost took the pot to my room so I wouldn't have to share.. Boy #2 was actually listening and said, "HA, she's taking the POT to her room".. we've been having lots of MJ/Pot jokes here because of the legalization thing on the ballot ...

Broccoli Cheese Soup
2 pounds broccoli, rough chopped; stem peeled and cut into 1/4-inch pieces*
2 tablespoons butter
Water
1/2 tsp. baking soda
2 cups Chicken Broth or bouillon**
1/2 onion, rough chopped
2 to 6 garlic cloves minced, depends on size
1 cup Cheddar Cheese, shredded
1 cup Parmesan, or Romano, or Asiago cheese, fine grated
2 loose cups FRESH spinach***
Pepper to taste

Put butter into stock pot or dutch oven, heat up until it stops bubbling. Add broccoli, onions and garlic; saute a couple minutes. Add 1 cup water and baking soda. Cook about 20 minutes or until broccoli is soft; add spinach for just a minute. Puree' half of the broccoli mix in a blender with the cheeses. Then puree the rest of the broccoli. Return all puree' to the pot and add broth or bouillon. You may need to add water if still too thick. DO NOT BOIL.. Just gently reheat. Serve with buttered croutons.

*I used a bag of frozen broccoli. NOT 2 pounds, infact I don't know how big it was, maybe a pound. It was old too (shhhh).  Because I didn't have enough broccoli, I also added a cup of frozen fresh peas from my garden this year.
**I used 2 bouillon cubes and added them to the first batch of pureed veggies. And instead of broth I used water.
***I did not have fresh spinach. I used two large handfuls of frozen chopped spinach. Which I added right to the blender with the broccoli.

Also, I used Tillamook Garlic White Cheddar, about 2 ounces shredded equalled a cup; I also used Asiago cheese on the larger grind. We did NOT use the pepper, it did not need it, in fact it would have ruined it. I did not need to add salt either as the cheese did this for me.
The spinach dip was amazing as usual. I will tell you though that I prefer the Napolean brand of marinated artichokes. The brand I used tonight were definately inferior, very tough leaves to try to chop up and the marinade was different. Also I only used about 1/3 cup mayo and then put a splash of half and half in.. YUMMY!!!  My mom is actually allergic to mayo, so it was good I didn't have enough for the recipe. And I cooked it at 400 degrees to get it done quickly as I needed to lay down, and this way everything was ready at 30 minutes!  We had french bread with this, and for those who wanted it, I had strawberry freezer jam on the table for the bread for a "dessert"..

Saturday, April 28, 2012

Quinoa and Black Beans

No, not my recipe, but a fabulous one!!  This one was given to me by my friend Cortney who got it from Amanda Segeberg

1 teaspoon olive oil
1 onion, chopped
3 cloves garlic, peeled and chopped or minced
3/4 cup uncooked quinoa, RINSED & DRAINED and toasted
1 1/2 cups chicken broth
1 teaspoon ground cumin
1/4 teaspoon cayenne pepper
salt and pepper to taste
1 cup frozen corn kernels or lima beans
1 (15-ounce) can black beans, rinsed & drained (or dried beans soaked and prepared ahead of time)
1/2 cup chopped fresh cilantro

Heat oil in medium sauce pan over medium heat. Add onions and garlic; saute' until transluscent/soft. Add cumin and cayenne pepper and cook one minute. Add quinoa, chicken broth, salt and pepper. Bring to boil, then cover, reduce heat and simmer about 20 minutes or until liquid is absorbed. Remove from heat. Stir in corn or lima beans, black beans and cilantro.

Can be served immediately or refrigerated and served cold.

Thursday, April 5, 2012

hmmm.... Beans instead of oil....

Now I know why we are told to have beans in our storage!! You can use them in place of oil.. How great it that??!!! I got this from Crystal, a fellow prepper.


If your recipe calls for oil, you are going to use a bean puree. What is a bean puree you ask? It’s simply cooked beans with enough water to whirl in your blender. If you want a simple way to try this, take a can of beans (the entire can) and dump it in the blender and blend it. Done.

********************************************************************************
What I do is drain the can or jar of beans, rinse them, then put them back into the jar and fill the jar with cold water. Then I pour them into my food processor and blend them until smooth. Then I use them one to one for the oil.
********************************************************************************
If your recipe calls for butter, you are going to use cooked, drained beans.

For substituting beans for both butter and/or oil you are going to use a 1:1 ration. That means if your recipe calls for 3/4 C. oil, you are going to use 3/4 C. bean puree. If your recipe calls for 1 C. butter you are going to use 1 C. beans. You’ll use the same measurements for beans as your original recipe says to use for either the oil and/or butter.

When wondering which beans to use-you are going to match color for color. If it is a chocolate cake, use black beans. If it is a spice cake, use pinto beans. If it is a white cake, use white beans. Now, here is the tricky part…you can also use white beans in chocolate cake but you can’t use black beans in your white cake. Your family will wonder what all of those black specks are. To be safe, you can use white beans in almost anything.

Now, you’re going to add the beans however your recipe says to use the butter and/or oil. So, if your recipe says to cream the butter with the sugar-you’re going to cream the beans with the sugar. If your recipe says to add the oil to the dry ingredients, you’re going to add the bean puree to the dry ingredients.

If you are using beans in something like brownies or cookies that are supposed to be chewy, the beans will not make it chewy-it will be cake like. So if you’re family is big on chewy that doesn’t mean you have an excuse not to use beans. It just means you need to use half oil/butter and half beans. It will still be chewy and you’ll still be saving money and adding fiber and protein! Remember, I’m not big into all or nothing-even a little or half is better than nothing and it’s important that your family likes what you make!

Wednesday, February 8, 2012

Black Bean Brownies with Medjool Dates

Ok, three variations!! So read all the way down. Both of these are pretty low in fat, HIGH in fiber and protein!!  We love all of the black bean brownie recipes.  NOTE: you can use pinto beans or white beans instead!!!! 


Variation #1:

3 eggs

1 cup medjool dates, pitted
1/2 cup baking cocoa
1 TBS vanilla extract
1/2 tsp. baking soda
3 TBS oil or melted butter
1 (15oz) can black beans, rinsed and drained

Preheat oven to 350 degrees. Generously grease 8x8 inch pan.
In food processor, place dates, black beans and oil/butter and puree until smooth.
Add baking soda, vanilla and cocoa powder and again puree until completely smooth.
Allow food processor to blend for 3 to 5 minutes without stopping to emulsify.
Add eggs and mix well.
Pour batter into greased baking pan. Bake until slightly firm on top and edges pull away from the sides of the pan or toothpick comes out of center mostly clean (about 30 minutes).
Allow to cool and then frost as desired.


Variation #2 (lower fat):
 
3 eggs

15 medjool dates, pitted
1/2 cup baking cocoa
1/2 cup apple sauce
1 TBS vanilla extract
1/2 tsp. baking soda
1 (15 oz) can black beans, drained and rinsed
1 TBS oil

Preheat oven to 350 degrees.

In food processor, chop dates, oil and black beans until smooth.
Add baking soda, cocoa, vanilla, and applesauce. Puree until smooth, allow processor to run for 3 to 5 minutes with out stopping.
Add eggs and mix well.
Pour batter into greased 8x8 pan and bake for 30 minutes or until toothpick comes out mostly clean.
Frost as desired when cool.
Makes 16.

Variation #3 (MY FAVORITE, BESIDES ORIGINAL)

3 eggs
1 can black beans, drained & rinsed
1 tsp.- TBS real vanilla
1/2 cup baking cocoa
3 TBS oil
1/2 tsp baking soda OR powder
Dates
Granulated sugar
1/4 - 1/2 cup semi-sweet chocolate chips

Using a 3/4 cup, fill it half way with chopped pitted dates, then fill the rest of the way with sugar. Place everything in the blender or food processor, EXCEPT chocolate chips. Blend until smooth. Add chips and blend just until they are broken up. Pour into greases 9x9 pan. Bake at 350 for about 30 minutes or until toothpick comes out clean. Frost when cooled.

Frosting #1 : Better Crocker Fudge Frosting (cut in half for bean brownies above!!!!)


1/2 cup granulated sugar
2 tablespoons baking cocoa
1/4 cup milk (cow, goat, rice, coconut, almond... whatever kind you like)
2 tablespoons butter
1 tablespoon agave nectar OR corn syrup
dash of salt
1/2 to 3/4 cup powdered sugar
1/2 teaspoon vanilla

Mix granulated sugar and cocoa in 2-qt. saucepan. Stir in milk, butter, agave nectar or corn syrup and salt. Heat to boiling, stirring frequently. Boil 3 minutes, stirring occasionally; cool. Beat in powdered sugar and vanilla. Spread over brownies. Let cool.

Frosting #2:

1/3 to 1/2 cup semi sweet chocolate chips
2 to 4 TBS whipping cream

Combine and melt slowly. Pour over brownies and let set up for about 5 minutes before cutting.

Black Bean Brownies

1 (15 oz.) can black beans, drained and rinsed
3 eggs
1/2 cup baking cocoa
1/2 tsp. baking powder
1 pinch salt
1 tsp. vanilla (I never measure vanilla.. I just pour some in)
3/4 cup sugar
1/2 cup semi sweet chocolate chips

Preheat oven to 350 degrees
Lightly grease 8x8 square baking dish
Put all ingredients except chocolate chips in blender. Blend until smooth. Add chocolate chips and blend just a little to break them up a tiny bit.
Bake in preheated oven on middle rack until the top is dry and edges start to pull away from pan, about 30 to 45 minutes.

Frost with favorite frosting.

Frosting #1 : Better Crocker Fudge Frosting (cut in half for bean brownies above!!!!)


1/2 cup granulated sugar
2 tablespoons baking cocoa
1/4 cup milk (cow, goat, rice, almond, coconut... whatever kind you like)
2 tablespoons butter
1 tablespoon agave nectar OR corn syrup
dash of salt
1/2 to 3/4 cup powdered sugar
1/2 teaspoon vanilla

Mix granulated sugar and cocoa in 2-qt. saucepan. Stir in milk, butter, agave nectar or corn syrup and salt. Heat to boiling, stirring frequently. Boil 3 minutes, stirring occasionally; cool. Beat in powdered sugar and vanilla. Spread over brownies. Let cool.

Frosting #2:

1/3 to 1/2 cup semi sweet chocolate chips
2 to 4 TBS whipping cream

Combine and melt slowly. Pour over brownies and let set up for about 5 minutes before cutting.

Sunday, January 15, 2012

Power Balls

I love these, my kids love these!  These are yummy and very good for you.

Power Balls
1 pound (16 oz.) pitted dates or figs
1 cup peanuts, raw or roasted (or whatever nut you like)
1/2 to 1 1/2 tsps. vanilla extract
1/4 - 1/2 cup flaked grains (oats, or barley, or wheat, or rye... whatever you have)
1/4 cup craisins or raisins (optional)
1 - 2 TBS rice protein powder (optional)

Toasted coconut (toast under broiler until golden, you will want to watch it closely and stir occasionally).

Check dates for pits. Pits will break your food processor  blade. They are very hard, and are sharp at both ends. I usually bend the dates in half to check for pits.

Place peanuts in processor and blend a little. Add dates and blend until smaller. Add any other dried fruit and mix until fine. Now add the vanilla, grains and protein powder. Mix until fine.

Roll into 1-inch FIRM balls, then roll firmly in the toasted coconut. Store tightly covered in fridge.

Thursday, May 19, 2011

RICE MILK OR NUT MILKS

(WARNING: Recipes towards the bottom of this post)
Who knew you could make rice milk at home? Nut milks? I didn't until I saw a demonstration for a vitamix at Costco!  I have wanted a vitamix for about 10  years now, so what did I do? I got one. Why? Well the price of a case of rice dream at costco is about $16 per case which is only 12 quarts. If you buy an individual quart at Safeway or and grocery store, you are looking at $3.79 per quart or MORE!!! Super crazy! Why pay that much when you can make it at home for pennies per quart?
First thing I made when I got home with my new toy was make a smoothie, spinach, blueberries, bananas, carrots, apples, oranges and ice. The kids LOVED it.. of course we always loves smoothies, but this blender, er vitamix thing makes them really smooth.
Next I made a batch of cashew, almond rice milk. DD#2 was in heaven! Thick like cow milk, yummy and good for her too! She begged me to never buy rice dream again! That sealed it, this vitamix thing was not going to go back to the store!!  I use my vitamix atleast once a day now! Crazy, but so easy to use, and clean!  .... oh woops off track, I am supposed to be posting the recipe.. ha ha.. I just had to explain why I have the vitamix (justification?).. Love it, I hope the power doesn't go out so that I can still have my daily spinach smoothie :) or spinach sorbet (kids love it with cottage cream!!!)

Our FAVORITE Milk Mix
3 cups cold water
1/4 cup (50 g) cooked rice
1/4 cup (35 g) raw cashews
1/4 cup (35 g) raw almonds
2 TBS to 1/4 cup (17 g to 35g) coconut, sweetened or unsweetened
dash of salt
2 pinches of sugar to 1/4 tsp.
splash of vanilla extract up to 1/2 tsp.

Place all in vitamix in order, secure lid
Select variable 1.
Turn machine on and quickly increase speed to variable 10, then HIGH.
Blend for 3 to 4 minutes or until desired consistency is reached. Store in refrigerator. SHAKE well before using.

Rice Milk:
1/2 cup (100 g) cooked rice (whatever kind floats your boat)
2 cups (480 ml) cold water
pinch of salt
1/2 tsp. vanilla extract
1 tsp sugar (brown or white)

Place ingredients into the Vitamix in order listed and secure lid.
Select Variable 1.
Turn machine on and quickly increase speed to variable 10, then HIGH.
Blend for 2-3 minutes or until desired consistency is reached.
Store in refrigerator.
Shake well before using.


Almond or Cashew Milk
If you desire to strain away sediment, place a fine mesh sieve over a large bowl. Pour almond milk slowly into sieve and allow to filter through, or stir the milk in the sieve with a spatual to encourage it to pass through more rapidly. Do not strain if using cashews.

3 cups (720 ml) water
1 cup (140 g) raw almonds or cashews
pinch of salt, optional
sugar or sweetener to taste, optional

Place all in Vitamix containter in order listed, secure lid.
Select Variable 1.
Turn machine on and quickly increase speed to Variable 10, then to HIGH.
Blend for 2 minutes or until desired consistency is reached.

Coconut milk
Strain through a fine mesh sieve for a smoother drink.

2 cups (480 ml) water
1 cup (75 g) shredded coconut, sweetened or unsweetened

Place ingredients in Vitamix, secure lid.
Select variable 1. Turn machine on and quickly increase speed to 10, then high.
Blend for 3 minutes or until desired consistency is reached. Chill.

Sunday, May 16, 2010

Chocolate Peanut Butter Oatmeal NO BAKE cookies

1 cup sugar
1/4 cup butter
2 TBS. baking cocoa
1/4 cup milk or rice milk
1/4 cup peanut butter
1 1/2 tsp. vanilla
1 1/2 cups quick oats (NOT INSTANT) or regular oats

Melt butter in pot over medium heat. Add milk, cocoa and sugar; mix together. Mix/melt peanut butter in and add vanilla. Take off heat. Add oats and stir well.
Plop spoonfuls onto plate or waxed paper and let cool until hardened enough to pick up. 
Store covered in cool place.

Japanese Pumpkin Soup (kabocha)

35 min

10 min prep
SERVES 4

1 lb japanese kabocha squash**
1 small onion, thinly sliced
3/4 cup milk ***
2 chicken bouillon cubes*
2 1/3 cups water
1 tablespoon butter
salt and pepper (to season)

Cut pumpkin in half and remove seeds.
Place pumpkin on a plate and heat in microwave for one minute (optional).
Slice pumpkin thinly.
Heat butter in saute pan and cook onion slices until softened (or golden).
Add pumpkin slices to the pan and saute.
Add chicken bouillon and water and simmer vegetables until softened.
When cooked, whirl the vegetables and broth in a blender or food processor until smooth, or use a stick blender.
Return to the pan and add milk.
Heat the soup over low heat.
Season with salt and pepper to taste.

*I use homemade chicken stock as bouillon has corn in it. Sometimes I add more liquid so it isn't too thick.
** It is hard to find a 1 pound kabocha. I usually use a 4 pound and adjust the recipe for that.
*** I use a half to whole can of coconut milk as Jaslyn is allergic to milk. This gives a wonderful creaminess.